Showing posts with label blogging. Show all posts

Sunday, March 15, 2009

Scheduling Blogger Posts

To build traffic on your blog, you need to--among other things--update your content frequently. If you give your readers something new on a consistent basis, they'll come back and look at it. However, for most of us, life can intervene. There's overtime, family requirements, vacation, and maybe a well-deserved writer's conference or two.

Fortunately, Blogger lets you write posts ahead of time and schedule their publication. And the good news is, it's easy to do. A few posts ago, I referenced writing a blog post now and publishing it later. If you're going to be around later, you can go into the post and publish it manually.

Or, you can set the publication time and let Blogger do the publishing for you. Here's how:

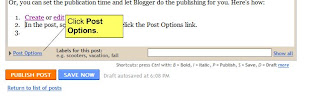
1. Create or edit your post.

2. In the post, scroll to the boot and click the Post Options link.


3. Set the Post Date and Time values for a time in the future.


4. Click Save Now.

A couple notes:
If your default timezone is not your actual timezone, (in other words if you have your timezone set to Hawaii time and you specify 6:00 PM today to schedule your post), Blogger will know if it's not 6 in Hawaii yet, and will wait to publish your post. To set your timezone, click Settings > Formatting and select the correct time zone (fifth field down).

In my experience, Blogger's Compose window sometimes doesn't show what you're going to publish if you schedule publishing. You may wind up with a couple extra hard returns if you publish in the future.

Saturday, March 14, 2009

Graphics in blog posts

Words are wonderful things. But too many of them, without any graphical relief, can make your blog less visually appealing than it might otherwise be. Not only that, the content of your blog could be enhanced by pictures.


If you're blogging about the same non-fiction topics as you've put in your book, pictures related to your topic would be outstanding to include. If you're a fiction author blogging about the experiences of your book tour, you can include some shots of the throngs of adoring fans. Either way, as the saying goes, a picture is worth a thousand hits from excited users.


There are three steps required to put a picture on your blog: taking the picture, getting it on your computer, and getting it to the blog. For information on the first two parts, consult your camera's user's manual, or get a kid to do it. For the third part, getting the picture from your hard drive to the blog, follow these steps:

First, make sure the picture is in a web-friendly format. JPG is the typical format used by most cameras, and it renders fine on the web.

Second, create or edit your blog post, then click the icon that looks like a picture at the top of the Compose window.


A window appears the allows you to either select a picture from your hard drive or from an online source. For right now, we'll assume it's on your hard drive. Click Browse and select your picture.


Click Done when the window appears announcing that the image was uploaded. Unfortunately, Blogger's Compose editor is cranky about adding pictures. The picture gets added at the top of the post. If you need to insert it later in the post, as I've done here, you can drag it to where you want it to appear. You'll also need to clean up some extra white space.

Selecting an Image from the Web

You can also select an image that already exists on the web. If you upload your pictures to Flickr or Facebook or someplace else on the web, there's no reason to reload them. Instead, grab the URL (web address) and enter it into the URL field in the Blogger form where you specified the file name. To get the URL, go to the picture and right click, the select Properties....

Select the URL from the file, then press Ctrl-C to copy the URL. Paste it into the URL field.


NOTE: Pictures are considered intellectual property. If you pirate someone else's picture, you're not only inviting potential issues down the road, you're also taking money out of someone's pocket.

Next time: How to schedule future posts

Wednesday, March 11, 2009

Working with Blogger Settings, Part II

As we near completion of our Blogger posts, we'll talk about how to work with Comments, Archiving, and E-mail settings. In most cases, the settings provided as a defaults will work for you, but these settings allow you greater control of your blog.

Comment Settings. One of the neat things about blogs is the ability to interact with your readers. This is especially true if you're using your blog to market your writing. Responding to reader comments can make a fan of that reader for life. You can show or hide comments, limit who can comment, and determine whether comments must be moderated, among other things. As with the other settings, if you accept the defaults for comments, you'll probably be fine. But as you get comments, you can control them using these settings.

Archiving Settings. After your blog post and its associated comments roll off the front page of your blog, they're still accessible via the archives. Archives typically appear in the sidebar. You can use this page to determine how your archive is grouped and whether to allow each post to have its own URL. (You should always allow each post to have a distinctive URL unless you want to prevent people from linking directly to specific posts.)

E-mail Settings. You can have the blog automatically send update notices to up to ten e-mail addresses and use the e-mail address to post to your blog directly from e-mail. Posting from e-mail is useful if you're traveling and have limited access ot the Internet, but still want to blog.

Next time: How to integrate graphics.

Tuesday, March 10, 2009

Working with Blogger Settings, Part I

Blogger includes a number of useful settings you can use to control and enhance your blog. Coincidentally, they're available on the Settings tab in your blog's Dashboard. Today, we'll cover the Basic, Publishing, and Formatting settings.

Basic Settings. These settings allow you to manage basic blog information, including the name of the blog, its description, and whether your blog is accessable by search engines and Blogger's internal listings. If you're writing adult content, you should set the adult content flag to yes. Remember, Blogger is hosting your content, and they can eliminate your blog if they think you're content's not appropriate.

Publishing. Only one setting is listed for publishing, but it's a key one: your blog's URL or web address. Anyone who's saved your blog URL as a favorite won't be able to find your blog if you change the URL. Unless you absolutely need to change your URL, you should keep it the same, even if the focus of your blog changes.

If your want to purchase a domain name (the name of a URL) from a hosting service, such as GoDaddy.com, you can specify that domain name here. (Buying the domain allows you to set your address to something other than blogspot.com.)

Formatting. Although you've already set your layout, you can adjust how things appear in your blog by changing the formatting settings. Formatting allows you to adjust how dates and times appear, what timezone you're in, how many posts appear on the first page, and a number of other settings. In most cases, the default settings will suffice for your usage.

Next time, we'll cover comments, archiving, and e-mail.

Monday, March 9, 2009

Editing Existing Posts

Blogger provides a dashboard of all the previous posts on your blog and allows you to edit any of them, even if they've already been published.

Getting There
Log into your blog, then click Customize. Click the Posting tab, then click Edit Posts. All of your posts are listed in chronological order, starting with the most recent. If a post is in draft status (that is, you saved it, but didn't publish it), the word draft appears to the right of the title and the labels you assigned to the post.

(Remember, labels allow you to categorize posts and provide tags users can click to view all the posts with that label. For instance, this post includes the label blogging, as do the rest of the posts in this series.)

What You Can Do
Click the triangle to the left of the post title to view the text in the post. To edit the post, click Edit. To delete the post, click Delete. Make sure you really want to delete the post, because once it's gone, it's gone.

If you decide to add a label to several posts, select the posts, then click the desired label in the Label Actions dropdown (above the Edit link for the most recent post).

To filter your posts, click the category links above the list (All, drafts, scheduled, etc.). If you've published a post, a View link appears, that allows you to view that post as it appears on your blog.

Links for all your labels appear to the left.

The Bottom Line
After you've used the blog post list a couple times, it becomes second nature and very easy to use. You can write posts ahead of time, save them, then publish them; apply labels to any post or group of posts, and delete posts.

A Quick Word About the Comment Moderation Feature
If you moderate your comments, you can control comment moderation using that link. If you don't have comment moderation turned on, clicking Comment Moderation displays a link to the area that allows you to change the comment moderation settings.

Next time, we'll talk about settings in Blogger.

Sunday, March 8, 2009

Entering Blog Posts in Blogger

What good's a blog if you don't say anything in it?

Entering blog posts can be very easy. Just go to your dashboard, select your blog, and click the Posting tab. By default, a page appears that allows you to enter all the information in your blog post, starting with the title. By default, your title will link to a page with only the current post (useful if you want to send a link to one specific post). However, you can use the Link field to link to a different page.

Below that, you can enter your post. If you pick the Compose option in the work area, you can enter text just as you would in a word processor. Unless you're fluent in HTML and want to do something the text editor doesn't allow, you can do everything you need to in the Compose view.

Under the text-entry area, you can specify labels for your posting. Labels are very useful, because they allow users to display groups of related blog posts. For instance, the labels for this post are blogging and social media. If you click one of those labels at the bottom of the post, Blogger displays a list of all the posts in that category. You can also display your labels your sidebar in the Layout tab.

If you click the Post Options link to the left of the labels entry, you can determine whether to allow comments for this specific post, and reset the date and time to appear with the post.

Finally, you can publish the post now, or save it to complete or publish later. I'm writing this post with a plan to publish it in the future. Remember, blogging depends on new content to attract readers. If your blog posts aren't timely, you can write some now, and publish them later so there's something new every few days.

Next: How to edit existing entries.

Tuesday, March 3, 2009

Blogger: Changing Your Blog's Templates

So you've started out and you have a blog with some good content and some cool tools, but it looks like every other blog on blogger. You don't want to have to create your own appearance, but there has to be something a little less generic.

There is.

Blogger has a number of pre-configured templates you can use to fit the theme of your work and give it a little personalization, and you can modify them at anytime.

To change your template, go to your blog and log in, then click the Customize link at the top of the page. Your dashboard for that blog appears, set to the Layout tab. In the Layout tab, click Pick New Template. A page appears that allows you to change the appearance of your blog.

In general, all the templates have a similar look with a header, an area for your posts, and a sidebar for all the cool gadgets you picked.

To see what your blog looks like in that template, click Preview template under that template's display and options. To apply a template to your blog, click Save Template.

In future installments, we'll take a look at how to post entries in your blog.

Thursday, February 26, 2009

Blogger Tools

Okay, you've planned your blog on Blogger and you've started creating your site, but what are your options to help the reader have a wonderful blog experience?

Today, we'll concentrate on the Layout button and all the cool things it lets you do. To get there, go to your blog and log in. Then click the Customize link in the upper right corner. The Customize link takes you to the Layout tab for your blog.

You can use the Layout tab to arrange and modify your blog's building blocks. Each building block has an Edit link, which allows you to control the content in that block. Selected building blocks are shaded. If you click a shaded block and drag it, you move it. (You can't move the header and blog posts blocks.

To view a selection of the tools available, click the Add Gadget link. If you click the link near that top, you add gadgets to your side bar. If you click the link at the bottom of your page, you add the gadget to the bottom.

That's great, you may ask, but what's a gadget?

The best way to find out is to click the link. A window appears that displays and describes a list of gadgets. You can add a gadget to your blog by clicking the blue button with a plus sign, all the way to the right of the gadget description.

The About Me Gadget
The About Me gadget is a key when you begin your blog. This gadget tells the reader about you and it's displayed on every blog you start. You should make the content in this gadget fit whatever you're trying to do with the blog.

Adding a Picture to your About Me Gadget
To add a picture, click the Dashboard link at the top of the page, then click Edit Photo. To select a picture from your computer, click the From My Computer option, then select the file you want to upload. The file should ideally be in .jpg format and should be about the size of a drivers' license or passport file.

Scroll to the bottom of the page and click Save Profile.

When you're done...
When you're done, click the link back to the Dashboard, then click the View Blog link (four links to the right of your New Post button).

Next time: Changing your blog's template.

Saturday, February 21, 2009

How to get started: Blogger

Blogger and WordPress are the two major tools available to you that can host your blog, and they're the best to start with. But there's a word of caution to keep in mind: if the content of your blog is too contriversial, either site can and will shut you down. (Authors of erotica may want to carefully study the terms of service for both sites and look for alternatives if they're too restrictive.)

To start in Blogger, follow these steps:

  1. Go to http://www.blogger.com/ and click the big orange button on the righthand side to create your blog.
  2. Set up your account. Since Google purchased Blogger, it's a Google account, but you can use any e-mail address to set the account up, whether it's Gmail or not. (Gmail is Google's e-mail service.)
  3. After you complete your account and click Continue, you just select your blog's name (it appears at the top of the page) and its URL. When you create the URL, you should use letters, numbers, and dashes, but you cannot use spaces. If your URL is taken, Blogger will suggest alternatives.
  4. Click continue and choose a template. This blog uses the Scribe template.
  5. Click Continue, then click Start Blogging.

The blog entry interface is like a limited word processor. When you publish, your text will be rendered using HTML, but you don't need to know HTML. Just use the button at the top of the text area and you'll be good to go.

Next entry: Blogger has a number of tools you can integrate with your blog. We'll cover them next time.

Tuesday, February 17, 2009

How to Blog, Part I

You're a writer, right? So the easiest way to start creating a presence for yourself in the virtual world is to write something. The easiest thing to write is a blog. A blog is like a web page made up entirely of what you have to say, except you don't have to actually construct the webpage. You just name the blog, choose a few options, and off you go.

Today, we'll cover figuring out what your blog's about. Depending on what you're writing and how you want to market it, you have an almost infinite number of possibilities.

Mystery author Michelle Gagnon has worked with a few other writers to create The Killzone, an eclectic blog that can be about the individual writers' books, or about topics of interest to them. Among the other authors with blogs are Laurell K. Hamilton, whose blog seems personal; Tess Gerritsen, which is person with a strong dose of her writing life; or my blog for my unpublished detective, Shane Black.

How you blog depends on where you are as an author. I'm using my blog (which should soon get a new short story), as a sample of my writing. That's appropriate because I'm unpublished. Laurell Hamilton and Tess Gerritsen both have loyal readerships who are interested in their day-to-day lives.

If you publish non-fiction, your blog could show your expertise in the area your book's about. If you're not published, including your blog's URL in a query is a great way to demonstrate your expertise. If you are published, it could act as a lead-in to your book.

On your blog, you should include a link to a place where readers can buy your book, such as Amazon or BN.com. Then, in your e-mail signature or any articles you publish or talks you give, plug both your blog and your book.

After you've selected what your blog's about, stick with that. your blog can evolve over time, but sharp changes in approach might not be useful.

Next time: Next time, we'll talk about getting started with the blog. Even if you aren't technical, you can create a professional-looking blog in no time at all.